
The New England Journal of Medicine
Ultrasound-Guided Peripheral IV Placement
Overview
Placement of peripheral intravenous (IV) catheters is a fundamental skill that all health care professionals should possess. Unfortunately, it can be difficult to obtain IV access in some patients, including obese patients, children, and patients who have undergone placement of many IVs or who have a history of difficult IV access. Ultrasound guidance enables visualization of veins that are not apparent on physical examination, resulting in fewer needlesticks, more rapid cannulation, and less discomfort in patients with difficult IV access.1-3 Ultrasound-guided IV placement is indicated when it is difficult or impossible to use traditional techniques. There is no contraindication to ultrasound-guided IV placement, but it is unnecessary when traditional techniques are sufficient. Health care providers who are proficient in standard placement techniques will find it relatively easy to learn ultrasound-guided techniques.
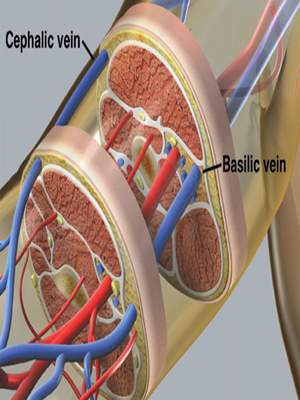
There are two common approaches to the position of the transducer during ultrasound-guided placement of IV catheters: transverse and longitudinal. The transverse approach is easier to learn, but the longitudinal approach is preferred by many experienced providers because it allows better visualization of the needle.4,5 It is best to learn both techniques. Potential cannulation sites are the hand, the antecubital veins of the forearm, and the basilic, cephalic, and brachial veins of the upper arm.
Preparation
To get started, wash your hands, adhere to universal precautions, clean the ultrasound transducer with a germicidal solution, place a tourniquet, and apply sterile gel or surgical lubricant to the transducer. Adjust the gain and depth settings of the ultrasound system so that vessels appear black and are in the center of the ultrasound image.
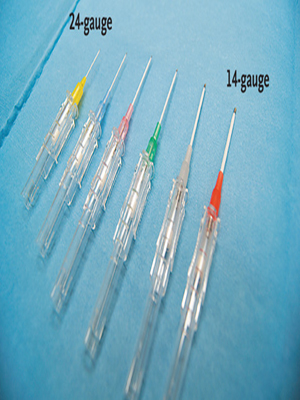
Find an appropriate vein by scanning the arm in the transverse orientation, which provides a cross-sectional view of the anatomy and allows simultaneous visualization of veins, arteries, and other structures (Figure 1). Vessels appear as circular structures, and veins are easily distinguished from arteries because veins collapse with compression. When choosing a vein, remember that a vein with a relatively large diameter is more likely to result in successful catheterization. The depth of a vein is not as important as its diameter, but longer IV catheters are needed for veins that lie more than 1 cm from the surface of the skin. Standard IV catheters are 3.2 cm long (Figure 2). Common sizes range from 24-gauge for newborns to 14-gauge for adult patients with trauma. Angiocatheters that are 6.4 cm long are adequate for cannulating vessels that are a maximum of about 2 cm from the surface of the skin. Specialized catheters may be best for cannulation of deeper veins.
Placement with the Transverse Technique
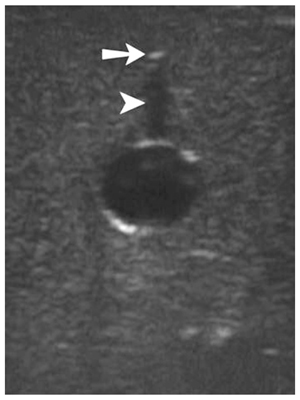
Make sure that the left side of the transducer correlates with the left side of the ultrasound image. Identify the target vein and note the depth of the vein. Clean the skin with an antiseptic swab. Insert the needle through the skin at a 45-degree angle. Advance the needle toward the vein and look for the needle tip. Since the needle is perpendicular to the ultrasound plane as it passes through the skin, it appears as just a single bright dot with posterior shadowing or a repeating artifact (Figure 3). As you advance the needle tip, follow it by fanning or tilting the transducer in the direction that the needle is traveling. If you cannot identify the needle tip, look for compression and movement of the adjacent soft tissue and tenting of the anterior wall of the vein. Bouncing, or vibrating, the needle will enhance movement of the soft tissue adjacent to the needle and may help you identify the position of the needle tip. Watch for blood return as an indication that the needle tip has entered the vein. Decrease the angle of the needle, and advance it by an additional 1 or 2 mm to make sure that the entire needle tip and the tip of the catheter are inside the vein.
While holding the needle still, advance the catheter over the needle and into the vein. Secure the catheter in the standard fashion and flush with saline.
Placement with the Longitudinal Technique
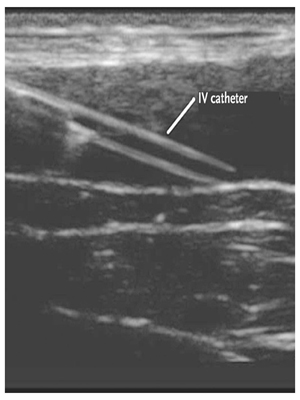
Identify the target vein and surrounding structures using the transverse view, then rotate the transducer 90 degrees to the longitudinal axis of the vein. It is crucial to know which side of the ultrasound image represents the distal vein, because that is where the needle will enter the image. Anchor your hand on the patient to keep the transducer completely still during the procedure, so you do not lose site of the vein while advancing the needle. Clean the skin with an antiseptic swab. Insert the needle through the skin at precisely the center of the long axis of the transducer, at an angle of 30 degrees, and carefully advance it within the ultrasound plane. The needle should be well visualized in the long-axis view (Figure 4). If you can see the vein but not the needle, then the needle must be lateral to the vein. Back up and redirect the needle as necessary. Do not advance the needle unless you can visualize the tip. The anterior wall of the vein may become compressed in response to needle contact, so use a quick forward motion to puncture it. Visualize the needle tip inside the vein and watch the catheter as it is advanced off of the needle and into the vein (Figure 5). Secure the catheter and flush with saline.

Complications, Common Errors, and Keys to Success
Overly deep placement of the needle is a common problem, especially when the transverse technique is used. Centimeters are marked along the edges of all ultrasound images to indicate the depth of scanning in relation to the skin surface. Ergonomics is important and should not be overlooked. The patient’s arm should be positioned on a flat horizontal surface, so the ultrasound images and needle movements are both in the vertical plane. Adjust the position and height of the patient and the ultrasound monitor so that you can work comfortably, without bending or stooping or having to turn your head to see the ultrasound images. When catheters do not flush well after insertion, consider checking the longitudinal view to diagnose the problem. Transducer selection is important. Linear-array transducers with high frequencies (5 to 14 MHz) are specifically made for ultrasound-guided procedures (Figure 6).
Summary
Ultrasound guidance facilitates placement of peripheral IV catheters when standard techniques fail. Learning ultrasound-guided techniques is relatively easy, especially for providers who are proficient in the placement of standard IV catheters. Small linear transducers and long IV catheters are ideal for ultrasound-guided IV catheter placement.

Scott Joing, M.D.,
- Seth Strote, M.D.,
- Liberty Caroon, R.D.M.S.,
- Christopher Wall, M.D.,
- Jamie Hess, M.D.,
- Chad Roline, M.D.,
- Laura Oh, M.D.,
- Ben Dolan, B.A.,
- Robb Poutre,
- Kathleen Carney, R.N.,
- David Plummer, M.D.,
· and Robert Reardon, M.D.